Cart is empty
Gardening Advice & Tips for Irish Gardeners
Raised Bed Vegetable Garden for the Weekend Gardener
Today was day one of starting my own raised bed vegetable garden and over the course of the summer I will log my activities in the quest to grow my own vegetables. The aim for this blog is to log the processes and work involved in growing vegetables from seed to harvest. I have decided that using only 1 small polythene greenhouse and two moderately sized raised beds would be most appropriate and that I would limit my time on these beds to a maximum of 4 hours per week. My reasons for this are:
I wanted you show that even in a small space you can achieve big results and feed yourself with a wide range of tasty veg.
As most of us live in small town houses we have limited space for vegetable plots and in many cases terrible soil conditions in which to grow. Raised beds are hence the best way to overcome these limitations.
I understand that most of us lead busy lives and that we have a limited amount of time that we can allocate to the garden. So hence a maximum of 4 hours per week was decided upon
DAY 1 [19th January] - BUILDING MY RAISED BEDS
There is nothing I love more than getting stuck in to a weekend project and this time with my 4 hour limit I thought I had my work cut out for me. Today I had to prepare the area where my beds would go and build and position my raised beds. So let the fun commence!
Step one: Choosing a location
I wanted the beds close to the house, easily accessible and most importantly in a sunny but sheltered location. And so I choose a southfacing corner of the garden which is surrounded on two sides by the house & garden fence – these will offer shelther, while the house itself will offer a small amount of additional heat – approx 2 degrees Celsius more warmth. As this is a south – west facing location it will receive sun from 10am through to 7pm in the evening in summer months. It also avoids the morning sun which can have a detrimental effect on tender vegetables on a frosty morning
Step two: Preparing the site
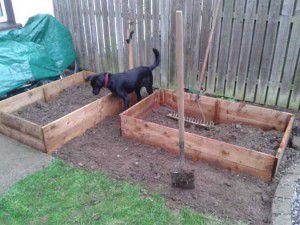
Because I have chosen raised beds there was little to do in terms of ground preparation - this was certainly a bonus. Ground preparation involved digging away the grass layer – to prevent grass growth through my raised beds later in the year. The grass sod was cut into long strips and then lifted and removed with a garden shovel
Next I needed to level the ground to ensure the beds would be perfectly flat – for both neatness and watering purposes. Once the grass sods were removed and the ground was roughly level I could start building the raised beds.
Step three: Building raised beds
This couldn’t have been easier or quicker to do. Using The Garden Shops Timber Raised Beds meant that this step took about 30 minutes to complete. The raised beds are built for environmentally treated spruce timber and come with complete instructions on how to build. I choose two ‘High’ raised beds to maximise the root space for my crops. These beds are 150cm x 90cm and 29cm high. This size is an ideal, workable sized for beds and sufficient for growing a range of vegetables both root crops and brassicas. Once the beds were built I positioned them leaving a 80cm gap between both for a path. The beds were set at a 90 degree angle to each other to maximise sunlight and they were levelled with a spirit level.
Step Four: Soil Preparation
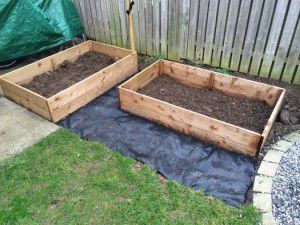
I hadn’t expected to get this far this week but with 1 hour to spare I had time to lay a weed fabric around the edge of the beds to from the base for my path. But I was also able to begin the crucial process of soil preparation. Even with 29cm high raised beds it would be recommended to light dig over the soil in the base of the beds. This is to allow for better soil drainage and also to allow for root crops to extend their roots right down into the existing ground.
To dig over the soil start at one end of the bed and, using a shovel, turn the soil over loosening it as you go. Continue this until you have reached the opposite end of the beds
So by the end of the first day I had my two raised beds in place and phase one of soil preparation well under way.